
So have you heard? I've got a brand spanking new studio and it is awesome!
It was about 18 months ago when I first asked April if there would be any space in the new Craft House in Bingley for an artists studio, or even just storage area. My old studio was in the cellar which I shared with the cats and the washing machine. My work, display items, stock etc was scattered around the house, in the attic, the cupboard at the top of the stairs, you name it I had something stashed away.

I'd basically outgrown my space so was looking for somewhere to safely store some of my work. I hadn't really planned on getting a studio away from home for a few more years yet and certainly not until I was ready to move to become a full time artist.
At the time April had just started work on the old, pretty derelict, building in Bingley and her plan was to mothball half of the lower ground floor as it had an old oven built in which would take some work to get out. After a couple of chats the next thing I know she'd changed her plans and asked the builders to convert the space into potential studio space.


Now this place is an old building on the Main Street in Bingley and April has literally had it re-built from the inside and the priority was to open up the cafe and workshop space first. These opened up early in 2020 and then we went into the first lockdown so building work for the lower ground floor stopped.

Meanwhile the house back in Saltaire was filling up with all sorts of additional "stuff" for the new studio, including a beautiful old plan chest which basically took over and lived in the living room for over a year. The cats loved their new perch and were pretty miffed when it was eventually moved out of the house.

Work stopped and started on the lower ground floor throughout summer and the studio was so tantalisingly close to finishing.

Meanwhile I continued to find more beautiful furniture for the new studio, including this magnificent old mechanics chest which I picked up from Pool Bank Vintage Interiors. I had it cleaned up and powder coated this glorious yellow and it is just perfect for all my art materials. What a find this was!

Just as the plumbing and electrics were being finished off we went into lockdown number 2... what a nightmare but thankfully enough work had been done in there for me to be able to crack on with the decorating and planning the furniture I wanted. What a difference with newly plastered walls, new ceilings, heating and more importantly a toilet!
So on with the epic job of decorating. The back room as you can see has this lovely vaulted ceiling but there is no natural light and the plaster makes the room look even darker. Added to that there were lots of cavities in the ceiling which really needed filling to stop dust falling into the room.

This was a mighty job getting this done but once I had a couple of coats of paint on there it soon made a big difference. I painted one wall a light grey so that I could use it for photo shoots and the corridor wall a very bright yellow just to liven the place up a bit. What a difference... you really wouldn't recognise this as the room where the bodies were stashed!


So from the start I knew that the back room would always be an office / packing space. Somewhere for me to store completed work, prints etc as well as having somewhere to be able to pack up work for delivery. At home this was a nightmare as I'd have to move from the cellar, to the kitchen to pack larger work and balance things on the kitchen table whilst being helped by furry animals. I had stuff stashed under the study desk for packing smaller items... and the scissors and tape were just going walkies all the time.
So I created my own packing station with a bit of creative thinking with some IKEA furniture and an electric saw and drill.... even better it has stayed up and hasn't fallen off the wall... for now anyway!

On the other side of the back room I have my IKEA glass fronted cabinets where I keep all my printed stock such as cards, calendars and books. These are great as I can see exactly how much stock I have for each item whereas previously I could only have a small amount of stock easily accessible and the rest had to go in plastic boxes up to the attic.

The front room was going to be my creative space. The place where I would paint as well as store all my paints and materials etc.
I do like to paint on a flat surface but also wanted to be able to use the walls for hanging work to dry but also to act as an alternative to an easel, where I could step back and see how the painting was coming together.
For the flat surface I had taken my old IKEA benches and used them for my packing station and desk in the back room. I wanted to get something longer and more importantly wider for my larger works and also something where I could store large canvases.
I came across a company (Arbor Garden Solutions) that make garage workbenches which you could customise so I went for the largest one they created which is 8 foot by 4 foot, with two shelves and on wheels so that I can easily move it around the space. I also choose to have shelving at the end of the workbench which is ideal for my paints, pigments etc.

It really is a brilliant piece of furniture and holds a surprising amount of canvases underneath. At the moment I still have decorating equipment stashed under there on one shelf but have filled up the other with all my canvases and boards.
I have stapled some white oil cloth across the top to keep it clean but it also doubles up as a good background for photographing work.
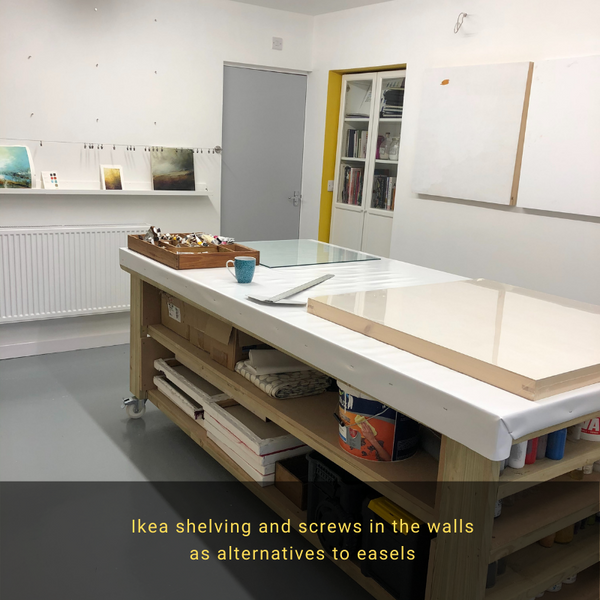
On the walls I have screwed in about 50 long screws to enable me to hang canvases from there and I have also used a couple of old IKEA shelves I had knocking around for smaller works on paper to dry. Also put the shelves over the radiator to protect work from the heat but also protect the radiator from paint splashes.
I also installed an IKEA Billy bookcase in the alcove which has the connecting door to the rest of the Craft House. As this was redundant space (as the connecting door was not in use) the bookcase was ideal, the challenge was it was exactly 80 cm wide and so was the alcove. Put it this way after a good hour of kicking it eventually went in. Probably won't come out in one piece though.
On the other side of the room I had some kitchen cupboards installed so that I can keep my essentials (tea and chocolate biscuits) out of the way of paints and chemicals etc.
I painted one wall a light grey so that I could use it as a backdrop for photographing work and got hold of another IKEA cupboard for stashing equipment.

And that is it, the studio is completed and now ready for some painting to happen in there. It is in a great location as it is opposite the railway station in Bingley and it's only a 45 min walk, 20 min cycle ride or 30 min jog (yeah right!) from my house.
The best part is that it is part of the Craft House so when we eventually get through this pandemic it is just a walk up a couple of flights of stairs for me to deliver workshops but more importantly only one flight of stairs to some delicious coffee, cake and lunch... can't wait!
I have created a virtual tour to give you more of an idea of the space and I hope to welcome you sometime when it is safe to do so. Enjoy!
My new studio address is now:
The Studio, Lower Ground Floor, 109-111 Main Street, Bingley, BD16 2HT
Access is at the rear of the Craft House on Wellington Street and is opposite the railway station. Parking is available outside of the station and also in the Wellington Street car park.
Visits to the studio will be by appointment only once we are out of lockdown. If you would like to visit me then please contact me directly.